Pryv.io Webhooks
In this guide we address developers that wish to implement notified systems with Webhooks. It describes what Webhooks are, why and how to use them on Pryv.io, illustrating it with a common use case.
Table of contents
- Introduction
- Pryv.io Webhooks
- What are Webhooks?
- Why using Webhooks?
- Why only notify of changes?
- Separation of responsibility
- Use case: Notify of a new document uploaded on your application
- Hands-on example
- Pryv.io Webhooks features
- Frequency limit
- Retries
- Reactivation
- Stats
- Deletion of the original access
- Endpoint setup
- User identification
- Endpoint testing
- Webhook authorization
- Events synchronization
- Conclusion
Introduction
Webhooks are a reliable system for real time streaming and push notifications to external services as your users’ data is created and modified.
The Pryv.io webhooks allow to automatically push subscriber data to your service whenever a certain event occurs and ensures that the data you are using in any process or algorithms of your service is up-to-date.
Pryv.io Webhooks
What are Webhooks ?
Webhooks are by definition a way to set up push notifications to an external service. It is triggered by data changes in an account that one wishes to be alerted of, mostly in order to act on it.
Why using Webhooks ?
Notification systems are used to receive updates of data changes in real-time. In addition to the Socket.io transport, we have added webhooks to allow push notifications.
You can now setup notifications without requiring to establish a connection and maintain it on the client-side. It is recommended for infrequent data updates and scales better for a high volume of users as it is more resource efficient.
Why only notify of changes?
Webhooks work through notifications of data changes: in other words, the modified data in itself is not directly shared with the external service, but only the type of resource that was altered as shown on the example below :
{
  "messages": [
    "eventsChanged",
    "streamsChanged"
  ],
  "meta": {
    "apiVersion": "1.4.11",
    "serial": "20190802",
    "serverTime": 1586254000.213
  }
}
Providing only an event identifier in the webhook payload will force the recipients to make an API request to fetch the full resource, and will ensure that they are authorized to retrieve the information they are notified about with since they are required to use an authorization token.
Separation of responsibility
Importantly, only the access used to create the webhook (or a personal one) can be used to modify it. This is meant to separate the responsibilities between the webhooks management and services that will consume the data following a notification.
Typically, a certain access will be used to setup one or multiple webhooks per user, while updated data will be fetched using a different set of permissions.
Use case : Notify of a new document uploaded on your application
In this section, we describe a real-life use case: the usage of webhooks notifications to alert a doctor when a patient of your app records a new health-related document.
Let’s imagine that you have created an application storing its data on a Pryv.io platform that enables to connect patients with doctors and you want to be able to notify a doctor when his patients upload a new document related to their health on the app.
The app created a webhook to notify the doctor’s service of data changes on Ana’s account.
The patient Ana has provided access to information on the stream Health with Dr. Tom by creating a read level access (see more information about access types here) and sending it to the doctor’s service using the app.
This allows Ana to post new events (data, picture, scan, audio file, etc) related to her health on this stream and her doctor to consult it.
What we need is to track every time Ana adds a new event in the stream Health, and notify Dr. Tom with the name of the patient and the type of the data (picture, number of steps, blood pressure, audio file, scan, etc…).
Let’s say that the patient Ana just uploaded her daily number of steps on the stream Health.
In this case, the data change in the stream Health triggers the webhook that will send a push notification to the doctor’s service. The service will then retrieve information (patient name and event type) from the stream Health on the Pryv.io platform using the read level access and directly send a notification to the doctor on his mobile app.
This notification message will contain information about the patient name and the type of event she posted on the platform : “The patient Ana has uploaded a new event of type count/steps”.
You can easily visualize the whole process on the following schema:
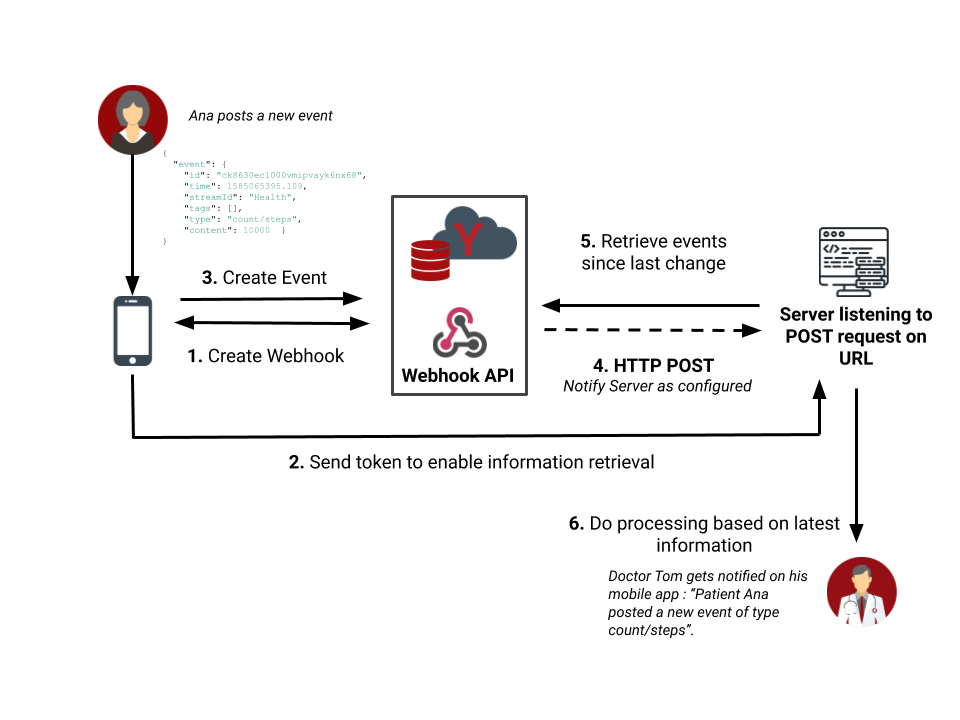
- Your app needs to create a webhook that will notify the doctor’s web service every time a data change occurs in the stream
Health. - Your app must also provide the doctor’s service with a
readaccess token to retrieve information about the events posted in the streamHealth. - Ana records her daily number of steps, creating an event on the stream
Healthon the Pryv.io platform. - As new data has been posted in the stream
Health, the webhook notifies the doctor’s service. - The service retrieves events since the last change using the
readtoken. - It performs the implemented process: it sends a message to Dr. Tom on his mobile app notifying him that a certain patient
Anahas posted a new file of typecount/steps.
Hands-on example
In this section, we will describe how to perform the previous example step-by-step using the Pryv Lab platform.
Based on the previous use case (see the schema above), these are the steps to follow to setup event notifications with webhooks:
If needed, create a new user account on the Pryv Lab platform here and obtain a token to create a webhook and store data into your account. You can generate an access token from the Pryv Access Token Generator.
You can set the permissions and leave other parameters unchanged:
[
  {
    "streamId": "health",
    "defaultName": "Health",
    "level": "contribute"
  }
]
- You then need to create the webhook by making an API call on the webhooks.create route with the necessary parameters. In particular, you need to provide the URL over which the HTTP POST requests will be made (see User identification on how to allow the service to identify the webhook’s account).
For example:
{
    "url": "https://notifications.service.com/pryv/my-pryv-username"
}
- You should then provide an Access token to the notified service so that it can retrieve new data when changes occur. You can generate an access token from the Pryv Access Token Generator.
You can set the permissions and leave other parameters unchanged:
[
    {
      "streamId": "health",
      "defaultName": "Health",
      "level": "read"
    }
]
- When your user adds new data to the platform, events related to his health are created and added to the
Healthstream using the events.create method.
You can use the following parameters for acount/stepsevent:
{
    "streamId": "health",
    "type": "count/steps",
    "content": 10000
}
- Once the event is created, the webhook is triggered. It notifies the external service that an
eventsChangedhas occured in the user account by sending an HTTP POST request to the provided webhook URL.
The request payload will look like this:
{
    "messages": [
      "eventsChanged"
    ],
    "meta": {
      "apiVersion": "1.7.10",
      "serial": "20190802",
      "serverTime": 1586254000.213
    }
}
- As soon as the server receives the HTTP POST request on the URL, it must retrieve the events since the last change from the Pryv.io platform using the provided token.
It does so by performing an HTTP GET request on the events from the streamId
healthusing the events.get method with themodifiedSinceparameter set.
The API response should look like this:
{
    "events": [
      {
        "id": "ck8pqobvr000voopvtlw9ct83",
        "time": 1586254000.167,
        "streamIds": ["health"],
        "streamId": "health",
        "tags": [],
        "type": "count/steps",
        "content": 10000,
        "created": 1586254000.167,
        "createdBy": "ck8pqobua0001oopvu6fhd3a2",
        "modified": 1586254000.167,
        "modifiedBy": "ck8pqobua0001oopvu6fhd3a2"
      }
    ]
}
- The server processes the data as configured. It must retrieve the information about the patient name and the type of the event that he posted (
count/stepsin this case).
It sends then a notification message to Dr. Tom about the new event that was posted in the streamHealth.
Pryv.io Webhooks features
In this section, we give an overview of all the features of the Pryv.io Webhooks.
Frequency limit
In case you are dealing with possibly frequent data changes, you might encounter a surge of data changes. In order to avoid notifying the external service too often, webhook executions have a frequency limit minIntervalMs. If multiple changes of different resources occur during a short interval, they will be bundled in the messages array of the webhook request payload.
The minIntervalMs parameter can be configured by the Pryv.io platform administrator.
Retries
In case of failure to send an HTTP POST request, such as a response status outside the 200-299 range or timeout, the webhook will retry the request at exponentially increasing intervals.
This backpressure mechanism is in place to allow the external service to stabilise in case it becomes overloaded.
The number of retries that the webhook will attempt is indicated in its maxRetries field. You can monitor its current retry attempt using the currentRetries field.
The maxRetries parameter can be configured by the Pryv.io platform administrator.
Reactivation
After a certain amount of consecutive failures to send a request, the webhook will be deactivated and no longer send requests when triggered. This will be indicated by the state parameter which will be set to inactive.
It will need to be manually reactivated using the webhooks.update method with the access that created it or a personal one.
Stats
Each time a webhook is run, it stores information about the HTTP response status and timestamp, respectively in the status and timestamp fields of a Run object.
A certain number of runs of a webhook is stored in the runs field of the Webhook in inverse chronological order (newest first). This parameter allows to monitor a webhook’s health.
The latest execution stats can be conveniently accessed in the lastRun field.
The number of times the Webhook has been run, including failures, is stored in the parameter runCount of the Webhook. Failures count is stored in failCount.
The number of stored runs can be configured by the platform administrator.
Deletion of the original access
In case the access that has created the webhook is deleted, it does not alter the webhook. It can still be modified using a personal access.
Endpoint setup
In this section, we present possible ways to identify the user from which the data change is originating in the webhook URL and to share a secret between your application and the webhook provider.
User identification
In order to identify the account which triggered the webhook notification, it is recommended to use the url of the webhook. It is possible to store the Pryv.io API endpoint in the URL path or query parameters:
In the path:
{
  "url": "https://my-notifications.com/stefan.pryv.me"
}
In the query parameters:
{
  "url": "https://my-notifications.com/?apiEndpoint=stefan.pryv.me"
}
Endpoint testing
In order to test that your service’s endpoint is reachable by the webhook calls, we offer the webhooks.test API method that triggers the webhook execution.
Webhook authorization
You might need to include a shared secret between your application and the webhook provider in order to control the API usage of your external service.
You can add a “shared secret” to the Pryv.io webhooks that your application trusts. This means that when you will be receiving a webhook notification, you can validate the provided secret and discard the request if it is not trustworthy.
This secret can be provided in the same way as the username, illustrated above. In this example, we use the path parameter to store the secret:
{
  "url": "https://my-notifications.com/stefan.pryv.me/my-secret"
}
Events synchronization
In order to make sure that the events data you fetch following a webhook notification contains only the new changes, it is recommended to keep track of the timestamps of your requests. Each Pryv.io API response contains Metadata whose serverTime you should save at each request.
Following a notification, you can retrieve the events using the modifiedSince parameter set to the serverTime of your last request.
Conclusion
If you wish to set up a Pryv.io webhook or get more information on the data structure, please refer to its data structure reference, while the methods relative to webhooks can be found in the API methods section.